My Stamping Corner

Wednesday, March 23, 2011

What happened to Spring???

We were just starting to get a peek into some milder weather...all the snow had disappeared....the birds were chirping away in the morning....I was really getting encouraged that Spring was actually making an appearance. Then came the sleet and snow last night!  I couldn't believe it when I saw across the top (or bottom?) of the TV...."Winter Snow Warning"!! What? What happened to Spring?! 

I guess I should be used to it by now - after all, this is Michigan! I'm getting over it, but I'm so ready for some relief from all the white stuff.

Which brings me to my card!
I was feeling "springy" so brought out Stamping Bella's Lizzy Lollipop
This little guy/gal (?) just always makes me smile!  

I colored the image with Copics and for the ground shadow using my Prismas and gamsol.  I traced around the inside of the Nestability I used leaving just enough room for my sentiment, which I'm sure you can tell I did by hand! (Wish I had Paula's ability to do those handwritten sentiments!) I added a little stitching, layered some Basic Grey Origins on Stampin Up! YoYo Yellow, a ribbon and a daisy!  Of course I had to add a little Stickles glitter on the wings and the ends of his antennae! Gotta have the bling factor, you know?!! 

For the inside of this card, I kept with the "bee" theme and layered another sheet of my Basic Grey Origins (which, incidentally, I have been hoarding so it was tough to let go of both pages of this pattern in my little 6x6 pad!!) onto some Stampin Up! Yo Yo Yellow.

I used one of my new favorite Nestabilities - Labels Sixteen...then stamped the sentiment and the little bee. Not sure where either one of those came from! Did some minor coloring with my Copics, added some sparkle to the wings of the bee and called it a day!

This card went together pretty easily and I love coloring this image! The Lollipops are some of my favorite stamps at Stamping Bella!


Hope you're having a good week wherever you are and no snow!! 


Thursday, March 17, 2011

Two-Timing Chick!!


Yah!!!  I won the That's Krafty Thursday Challenge again!!!  So I'm a "two-timing chick"!!  I entered the card below ("Sweet!") and was chosen as one of five winners out of 54 entries.

What an honor!!  Congrats to all the other winners and a big "THANK YOU" to Jeanie!!  If you haven't visited Jeanie's site (The Spotted Chick), hop on over there.....you're in for a treat!! She's one talented lady and always inspires me!!

Woohoo!!!!(doin' the "happy dance"!!)


Saturday, March 5, 2011

Sweet!!!

We have a brand new grandson!! It's been a busy couple of weeks ~ we were helping out with the older kids (11, 9 & 6) so we had our hands full. They are so excited about their new little brother! They want to hold him constantly...especially the youngest. She is so gentle and loving with him - just like a little mother. It's very SWEET!!  Which brings me to my card....(nice entrance, don't you think?)....

I have had this Mo's Digital image - Bronte and Louis - for awhile and couldn't figure out what sentiment to use with him. I wanted to do a card for my oldest son and thought maybe Louis would work!  I found the sentiments in two different stamp sets and they seemed to work well together. And don't you just love Basic Grey's new Pyrus paper?!! I paired it with Kraft & some old SU! Cranberry Crisp cardstock.

 "Hope your day is....SWEET as can be!!"

I also wanted to do a card to enter in Jeanie's "That's Krafty Thursday" challenge and this one will fit the bill! Sometimes I forget to use my kraft cardstock and also forget how versatile it is!  If you've never visited Jeanie's site (The Spotted Chick), you have a treat in store - her cards are GORGEOUS!! Every time I visit, I get another boost of inspiration!!


Bronte and Louis were colored with Copics. I think I'm finally getting the hang of them! Still a work in progress, but the more I use them, the more I'm loving them!! I did some shading with my Prismacolor pencils/gamsol, stitched around the edges and sponged with Chalk ink. I wanted to add the first part of the sentiment in a half-circle, but it looked a little 'blah' all by itself....so I used one of my smallest Nestabilities to cut out a scalloped circle in cork. I punched holes in each of the scallops to give it more definitioin. I like the way it turned out! A little colored cord and a button and this card is complete! (and no bling or sparkle this time...can you believe it?!!!)

Hope you all have a great weekend!!


Saturday, February 12, 2011

For the boys....

Trying to do Valentine's Day cards for boys is tough for me because I always want to make them too "frilly"!!  When I ran across this Stampendous stamp set, I thought ... maybe the monkeys will be a little less girly??

 
I tried to keep them as simple as I could....which isn't as easy as it sounds!!! Adding some bling here and there and a couple of hearts was about all I could safely get away with and still keep them un-girly!  I used the Nestabilities die to cut out hearts in cork and black felt to add something a little different to the norm.

I the first one did as a 'gate' card. These always turn out so well for some reason! I layered the cardstock & paper then stitched around before adhering to the card base. I did the same treatment to the inside and used Spellbinders Labels 16 for the sentiment and layered it on another cut of the same die in black cardstock. A little sponging around the edges and I was super happy with the way this one turned out! (I probably should've stuck with a square die since I was trying not to get too 'girly' - guess I kind of forgot my main goal! Oh well!)

Note that both of these cards are A-2 size, which I seldom ever do these days. I seem to automatically create square cards without so much as a thought to do otherwise!

The other card was super easy peasy! I actually used a layout that I saw on the Stampendous site for this set and just changed up the paper. I liked this paper a lot and thought it worked really well with this card.  I didn't even do any stitching on this one! I cut out the hearts from the same paper used on the front and put them inside. Here's what the inside of the other card looks like. Simple but sweet!


Both cards were colored with Copics and some shading done with Prismacolor pencils & gamsol.  I used paper from the Basic Grey Cupcake collection for the gate-card and I'm not sure about the other paper. I cut off the end with the name and threw it out before I made note of it - sorry! 

Now it's off to the Post Office to get these into the mail so my little munchkins will receive them on Monday!!


Have a great weekend and a Happy Valentine's Day!! 


Wednesday, February 9, 2011

Love Owls and Dreamy Eyes....

Oh I am in love!! I found these adorable "Love Owls" at the DigiStamp Boutique and just had to color them up for Valentine's Day!  I want to do them in lots of colors and send them to everyone!!  But, of course, I can't do that! I'll have to use some other images because I can't send the same one to all three of my grandchildren that live in the same household...that would never do!! (hee! hee!)

I printed them out on Bella's Bestest paper (as always!), colored them with Copics, cut them out with my oval Nestabilities, sponged with some chalk ink around the edges, then matted them on a piece of cork cut out with the big scalloped oval Nestabilities.  Don't you just LOVE the dreamy eyes on these two with some Glossy Accents added?!! 

The red felt heart was cut out with yet another Nestability, cardstock run thru the Cuttlebug for some dots, double loop punched on both the Baja Breeze and Chocolate Chip cardstock, then the button and ribbon added. The sentiment "Owl Always Love You" is from another set I had from last year's stash. I like how the different textures work together: bumpy dots, cork, felt, gloss, stitching... much more 'stuff' than I'm used to doing on my cards, but I really like how it turned out!!

Now back to the drawing board!!  Just three more cards to go and I'll at least have the grandkids covered for Valentine's Day!! 


Tuesday, February 1, 2011

Snowmen are pretty appropriate today!

Okay...I know everyone else is busy working on Valentine's Day cards now, but it's taken me this long to finish what I started with the snowmen! Here's the problem...my craft area is in the basement..and it's COLD down there! (brrrrrr) It's not usually bad but when the temps are in the single digits, it is definitely not a warm, cuddly place to be.

Anyway....here are my last snowmen! I wanted to try a gate-card for this one. Colored him up with my Prismacolor pencils/gamsol and added some Martha Stewart chunky snow and some stickles. The ribbon is SU and the snowflake....not sure, but it came on an acetate sheet, some having a blue rhinestone, some having a clear one. I used coordinating paper from the same collection on the inside. These are always fun to do!


The other two cards are pretty simple...just done in different color schemes.


Wouldn't you know it? In my haste to get these done, I forgot to sew them! So I did some faux stitching to the blue & brown card and some Martha Stewart Chunky Snow and Stickles.  I did a bunch of these, but promise I won't bore you with any more!!!

On to the Valentine's Day cards!!! 

So - we're expecting about a foot of snow where I live tonight. We're really hoping our electricity stays on through the night!  I hope you live somewhere warm and don't have to deal with this storm!  Keep warm! 

Saturday, January 8, 2011

Snowmen....

Unfortunately, I'm one of those people who procrastinates and is always late with everything!  Yep, that's what happened with the Christmas cards - just didn't start early enough! The "thank you" cards weren't ready either, so I'm trying to get those finished and sent out before February hits.

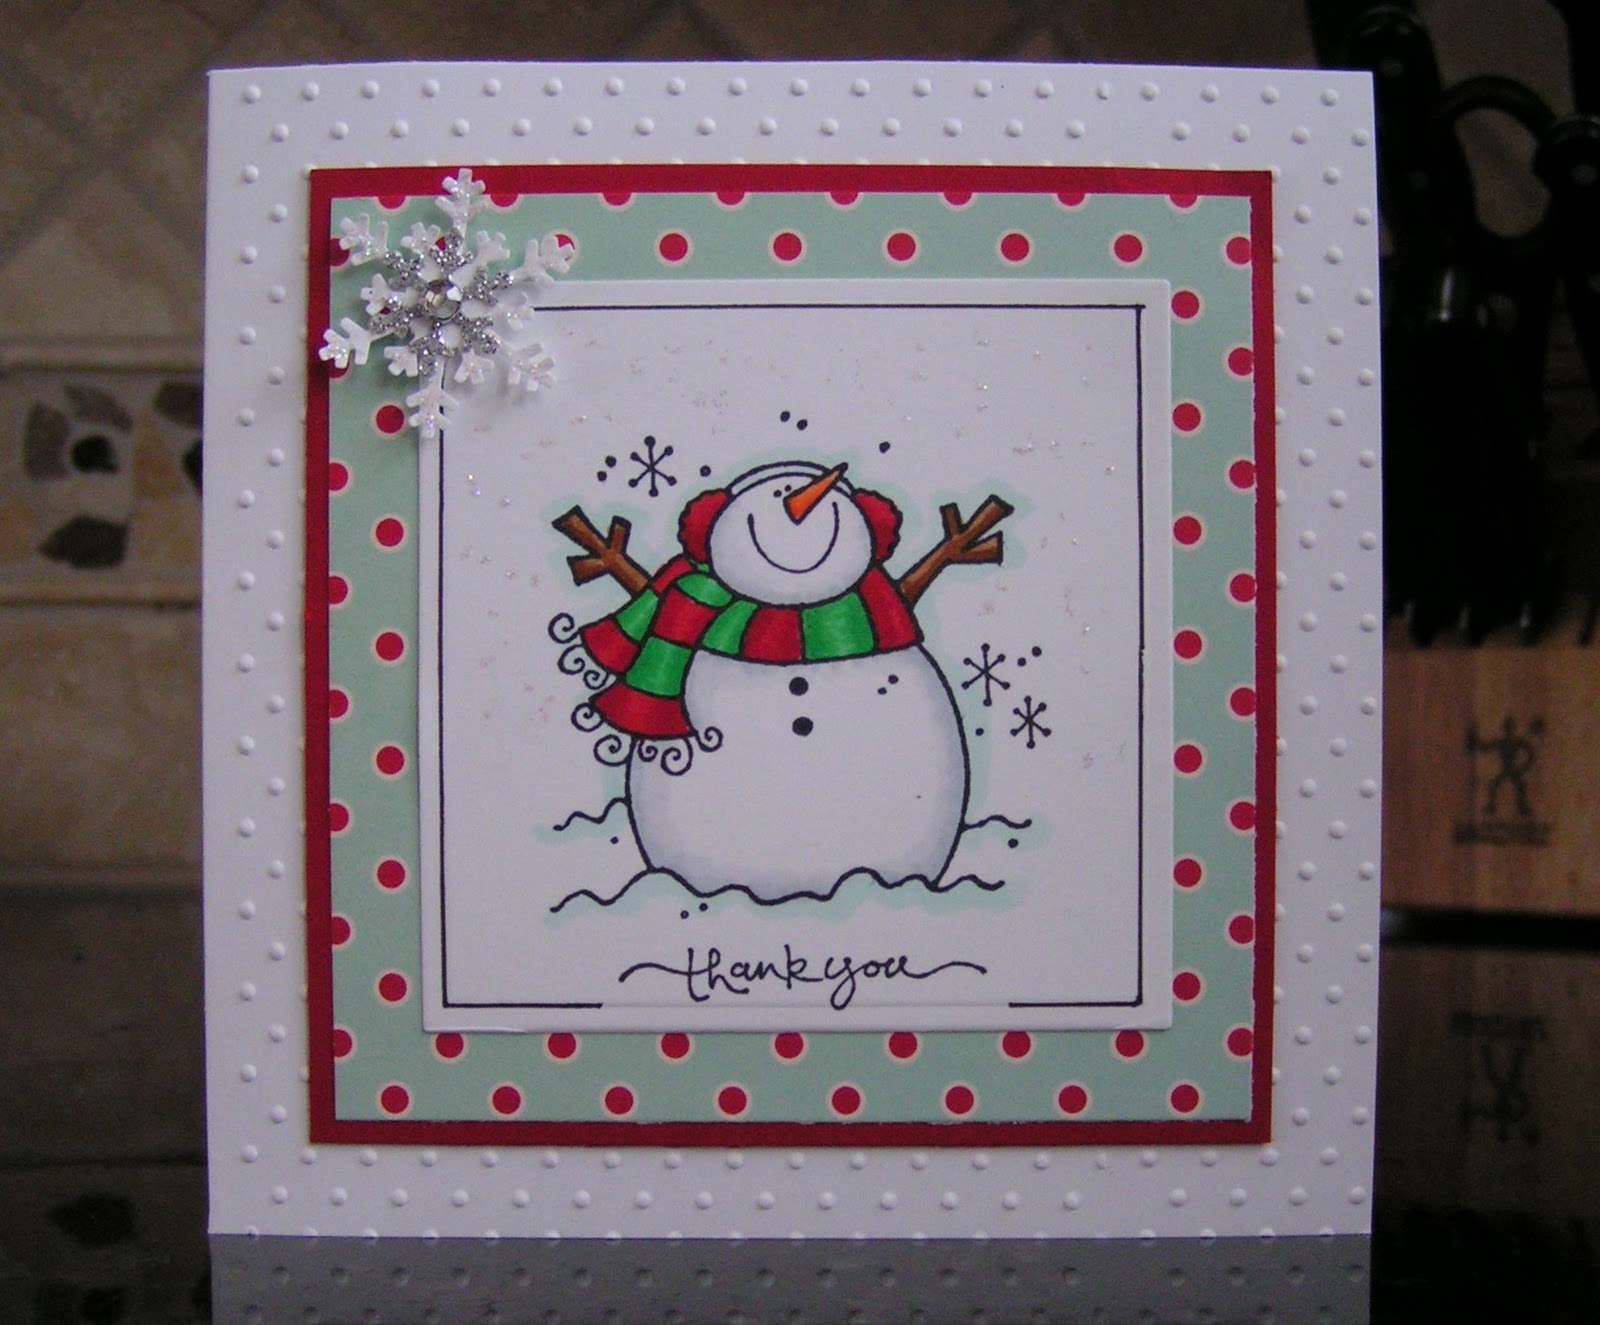
Since it's still winter (brrrr...) and these are thank you cards for Christmas gifts, I figured it'd be okay if these still looked a little Christmassy.  I decided on this Penny Black snowman stamp. He's such a cutie and is pretty quick and easy to color. I did him two different ways - one on white cardstock, the other on Kraft cardstock.

The first one was stamped on Kraft cardstock.  (I'm entering this one into Jeanie's That's Krafty Thursday Challenge #45!) His body was done using a watercolor pen and a SU! White Craft ink pad. I found this technique on another blog, but can't remember which one!!  I dragged some of the ink pad right onto an acrylic block then used the watercolor pen and that ink to color the snowman's body. I used Prismacolor Pencils blended with gamsol to color his scarf, arms and earmuffs. I added some light blue shading around the image, which looks more like white in the picture, but it really is light blue!  After doing a little machine stitching around the edges, I just added some Martha Stewart snow glitter, some Stickles and a couple of punched snowflakes. 


This one was colored with Copics on Bella's Bestest paper. I liked this one right away; it's bright, crisp and clean looking! So I went ahead and kept the completion of the card pretty simple too. Just a run thru the Cuttlebug for some texture, some layered paper and cardstock with some Stickles dotted here and there and a jeweled snowflake.  (gotta have a little bit of bling, you know what I'm talking about?!!)


I used a technique that I found on Jodi Collins' blog here (love her cards!) to create a frame. After stamping and embossing your image, remove it from the die and stamp the sentiment somewhere near the bottom edge. Then pop the image back into the die and trace around the inside edge with a Copic Multiliner leaving some space on either side of the sentiment.  Isn't this a cool technique and so easy to do!! I think it works best with words that are printed versus handwritten style since the handwritten styles seem to all go below the line you want to stay above. 

I like how both of these turned out!  One is kind of warm and cozy, the other one crisp and clean!  Which one do you like best??

I have one more snowman that I'm working on and a cute little Ellzybells stamp that I had in my stock. (Note: I just found out that these are no longer being made - how sad is that?!! - they were so cute)  As soon as I get some more finished, I'll get them posted.

Hope you have a great weekend!!